Using a nail drill cuticle bit on short nails can be a game-changer in your nail care routine. As a supplier of high - quality nail drill cuticle bits, I'm excited to share with you the proper techniques and best practices for this process.
Understanding the Nail Drill Cuticle Bit
First, let's talk about what a nail drill cuticle bit is. A Nail Drill Cuticle Bit is a specialized attachment for a nail drill. It is designed to gently and effectively remove excess cuticles around the nail bed. These bits come in various shapes and sizes, each serving a specific purpose. For short nails, a smaller and more precise bit is often the best choice.
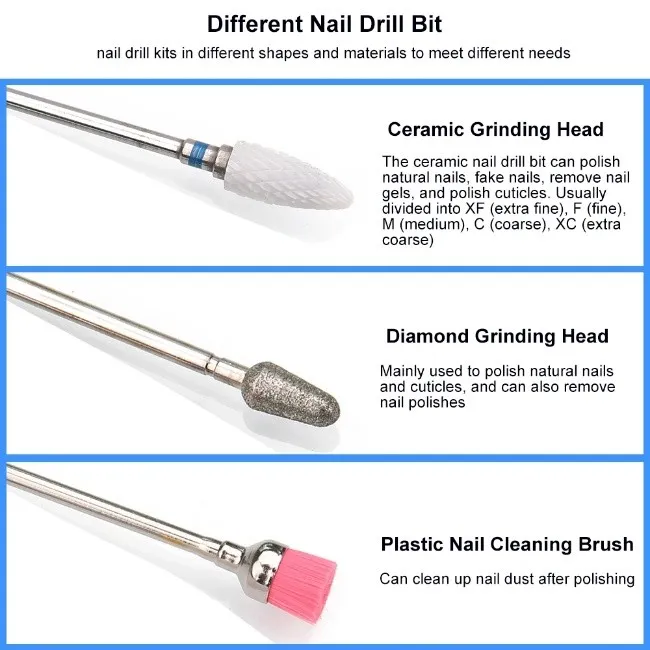
One of the popular types is the Ceramic Cuticle Bit. Ceramic bits are known for their durability and sharpness. They can cut through cuticles cleanly without causing excessive damage to the surrounding skin. The ceramic material also dissipates heat well, which is important as overheating can be uncomfortable for the client and may damage the nail.
Preparing for the Process
Before you start using the nail drill cuticle bit on short nails, it's crucial to prepare the nails properly. First, soak the nails in warm, soapy water for about 5 - 10 minutes. This softens the cuticles, making them easier to remove. You can add a few drops of essential oil to the water for a relaxing experience.
After soaking, dry the nails thoroughly with a clean towel. Make sure there is no moisture left on the nails or around the cuticles, as this can affect the performance of the nail drill bit.
Next, select the appropriate speed on your Ceramic Nail Drill. For short nails, it's recommended to start with a low speed, around 5,000 - 7,000 RPM. This allows you to have better control and reduces the risk of accidentally cutting too deeply.
Using the Nail Drill Cuticle Bit
Once everything is prepared, it's time to start using the nail drill cuticle bit. Hold the nail drill like a pen, with a firm but gentle grip. Place the bit at a 45 - degree angle to the cuticle. Start at the edge of the cuticle and slowly move the bit towards the center of the nail.
Be very careful not to press too hard. The bit should glide over the cuticle, removing the excess skin layer by layer. If you encounter any resistance, reduce the pressure and adjust the angle of the bit.
As you work on each nail, take your time and be precise. Short nails have less surface area, so it's easier to make mistakes. Focus on removing only the dead cuticle tissue, not the healthy skin. You can use a magnifying glass if necessary to get a better view of the cuticle area.
Safety Precautions
Safety is of utmost importance when using a nail drill cuticle bit. Always wear safety goggles to protect your eyes from any flying debris. Also, make sure the client's hand is stable during the process. You can ask the client to rest their hand on a soft cushion or a nail table to prevent sudden movements.

If the client complains of pain or discomfort at any point, stop immediately. This could be a sign that you are applying too much pressure or that the bit is too sharp for their cuticles.
After using the bit on each nail, clean it with a disinfectant solution. This helps prevent the spread of bacteria and fungi between clients.
Finishing the Process
Once you have removed the excess cuticles from all the nails, it's time to finish the process. Apply a cuticle oil or cream to the nails and massage it gently. This helps to moisturize the cuticles and the surrounding skin, leaving them soft and healthy.
You can also buff the nails lightly to give them a smooth and shiny appearance. But be careful not to over - buff, as this can damage the nail surface.
Advantages of Using a Nail Drill Cuticle Bit on Short Nails
Using a nail drill cuticle bit on short nails offers several advantages. Firstly, it is more precise than using traditional cuticle nippers. The bit can reach into small areas around the nail bed that may be difficult to access with nippers.
Secondly, it is less painful for the client. Since the bit cuts through the cuticles smoothly, there is less pulling and tugging compared to using nippers. This makes the process more comfortable, especially for clients with sensitive cuticles.
Finally, using a nail drill cuticle bit can save time. You can complete the cuticle removal process much faster than with manual tools, which is beneficial for both the nail technician and the client.
Maintenance of the Nail Drill Cuticle Bit
To ensure the longevity and performance of your nail drill cuticle bit, proper maintenance is essential. After each use, clean the bit thoroughly with a brush and a disinfectant solution. Make sure to remove all the cuticle debris from the bit.
Store the bit in a clean, dry place. You can use a dedicated case or a storage container to protect the bit from damage.
Periodically, check the bit for any signs of wear and tear. If the bit becomes dull or damaged, replace it immediately. A dull bit will not cut through the cuticles effectively and may cause more damage to the nails and skin.
Contact for Purchase and Collaboration
If you are interested in purchasing our high - quality nail drill cuticle bits, we would be more than happy to discuss your needs. Whether you are a professional nail technician or a beauty salon owner, our products can meet your requirements. We offer a wide range of nail drill cuticle bits in different shapes and sizes to suit various applications. Contact us for more information and let's start a great business relationship.
References
- "Nail Care Handbook" - A comprehensive guide on nail care techniques and tools.
- Professional nail technician forums and communities where experienced technicians share their tips and experiences on using nail drill cuticle bits.